Organization Settings
Organization Settings is the Azure DevOps hub for Spec Kit subscription, seats, access requests, users, AI Settings, and license keys.
Who this page is for: organization administrators only. Non-admins see a locked message. Regular members configure nothing here — ask an admin for seats and AI.
Jump to: Subscription · Users · AI Settings · License Keys
How to open it
- In Azure DevOps, open Organization settings (organization-level settings, not project settings).
- In the left menu, select Raaghu Spec Kit.
Only organization administrators can open this hub. Non-admins see a locked message.
Tabs: Subscription, Users, AI Settings, and License Keys.
This hub is separate from the in-extension Settings dialog (hamburger menu), which is used for project AI keys (LLM Settings), Raaghu AI for the current project, and command labels. Org-wide AI connections, per-project AI permissions, and Raaghu AI credits are managed here under AI Settings.
Subscription
The Subscription tab manages your plan and billing. Raaghu Spec Kit is the Professional Plan at $9 per seat / month (USD).
Getting started (not subscribed yet)
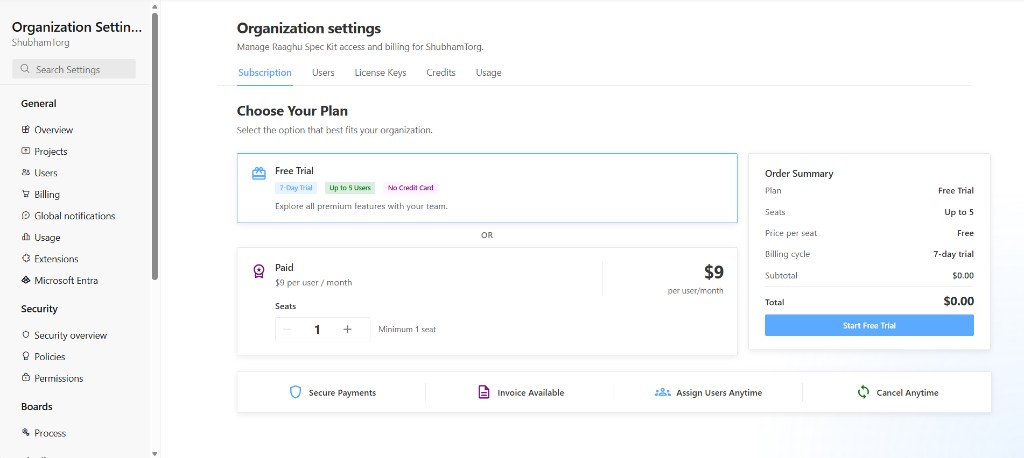
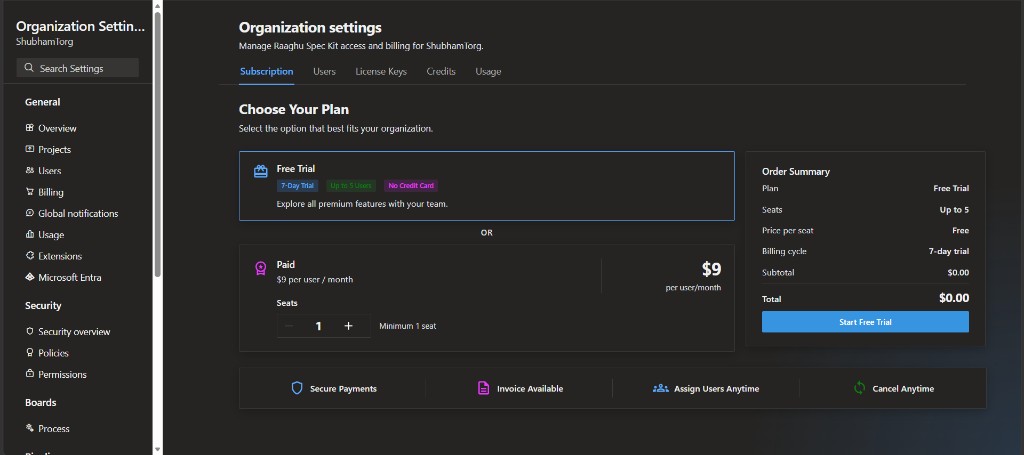
Eligible new organizations see a Choose Your Plan screen (tenant admins only, when the org is trial-eligible):
- Select Free Trial or Paid.
- For Free Trial — review the order summary (Up to 5 seats, 7-day trial, $0.00), then click Start Free Trial. No credit card is required.
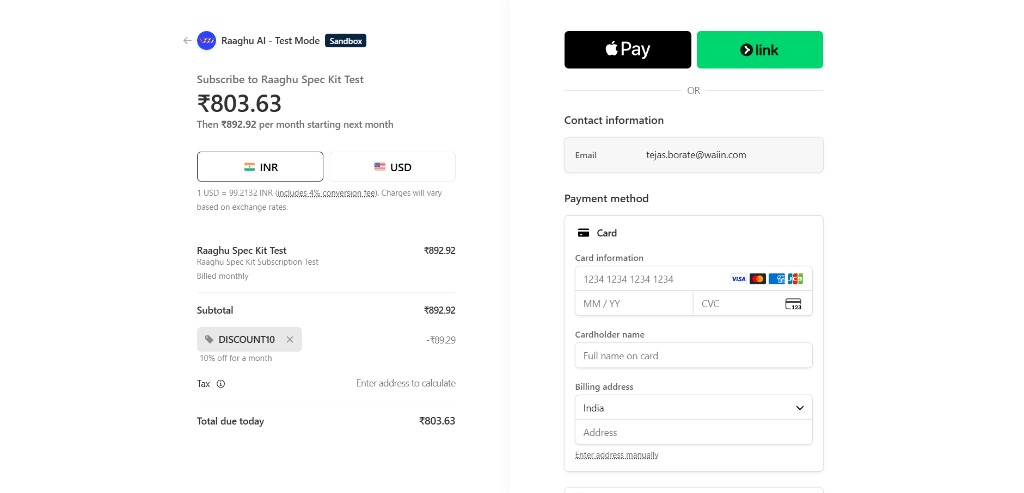
- For Paid — set seats with − / +, then click Subscribe Now and complete Stripe checkout. If you have a promotion code, enter it on the checkout page.
- Assign seats to team members on the Users tab.
If the organization is not trial-eligible (for example, it already used a trial or had a prior license), the tab shows the paid-only path: choose seats, then Subscribe for $…/month. You can also activate a key on License Keys instead of Stripe checkout.
After the trial ends, keep access by completing paid checkout here, or by activating a key on License Keys.
Promotion code
At Stripe checkout, you can enter a promotion code if one was issued to you. The discount appears in the order summary before you pay (you can remove the code if needed).
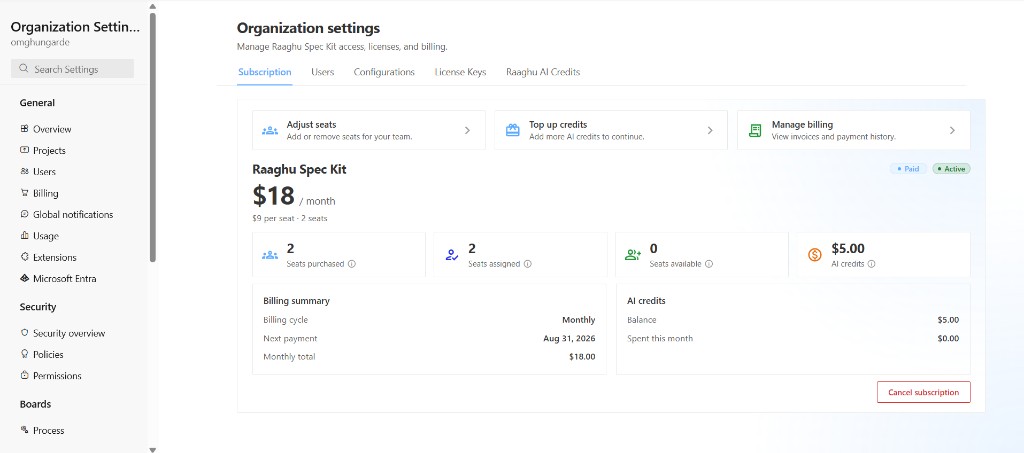
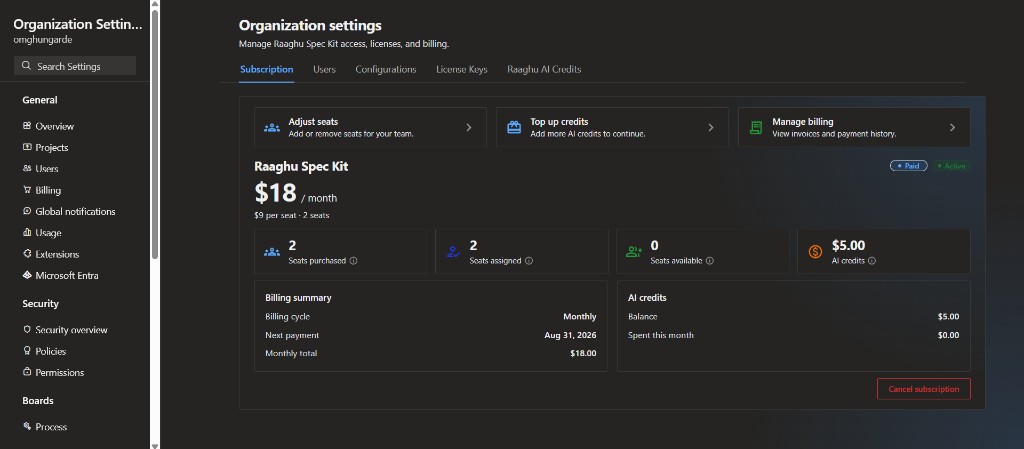
Once subscribed (paid, trial, or license key), the tab shows plan status (Active, Past due, Canceled, Canceling, and similar) and these actions:
| Action | Description |
|---|---|
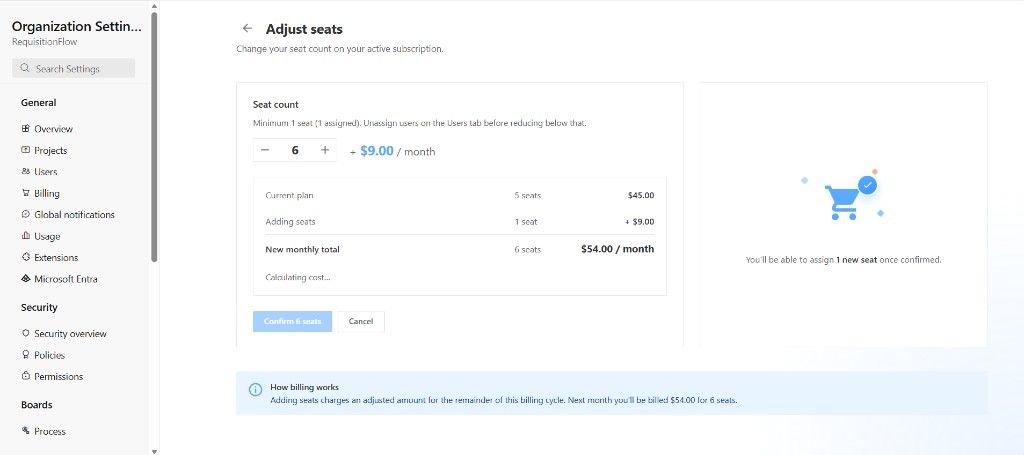
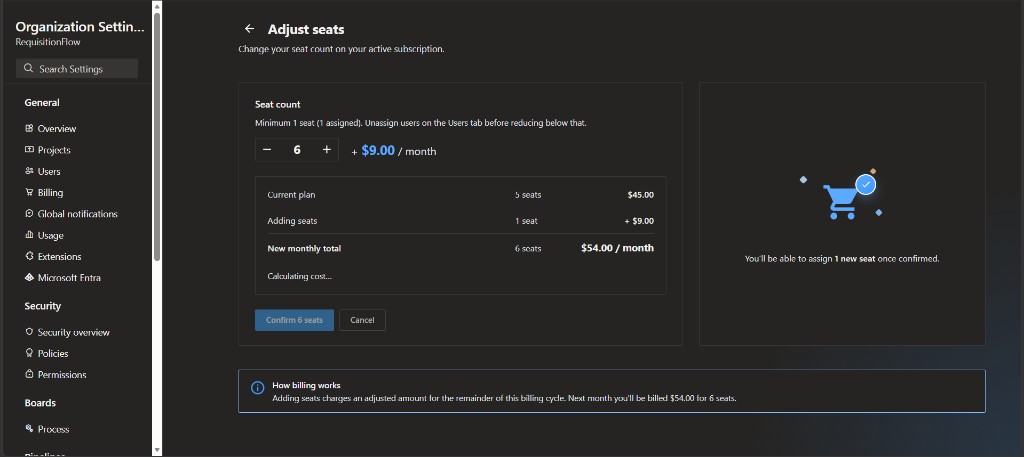
| Adjust Seats | Add or remove seats on paid card billing. Increases apply right away; decreases are scheduled for the next billing period (use Undo seat change if needed). During a free trial, seat count is fixed at 5 and cannot be changed here (contact support@raaghu.ai if you need a different count). With a license key, seat count is fixed by the key and cannot be changed here. |
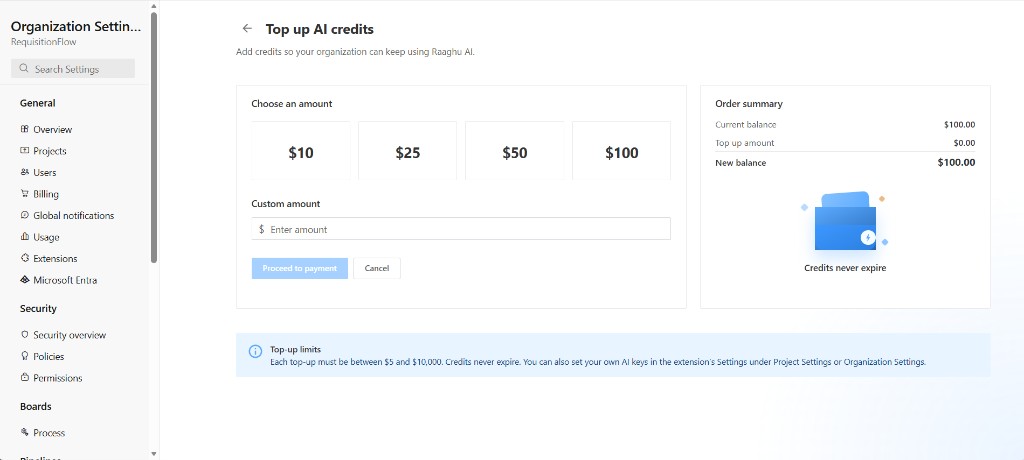
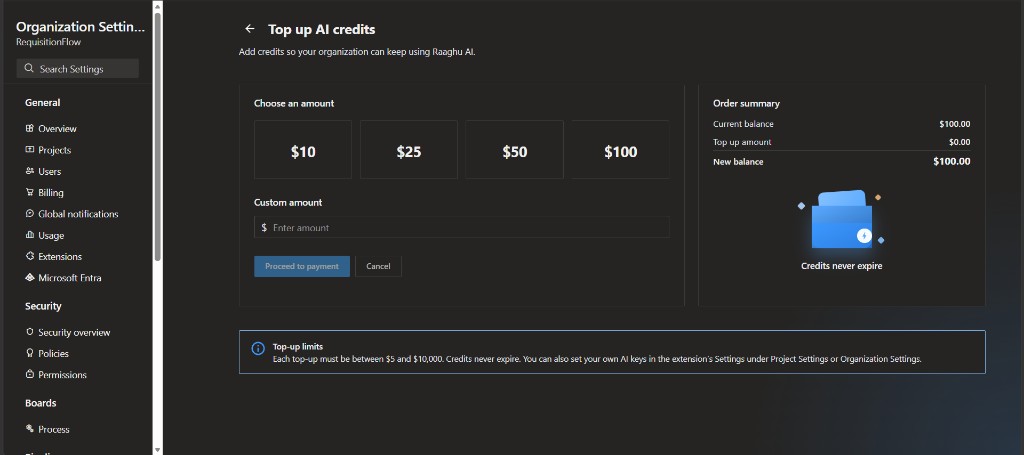
| Top up Raaghu AI credits | Add Raaghu AI credit balance ($10, $25, $50, $100, or a custom amount between $5 and $10,000). Credits do not expire. |
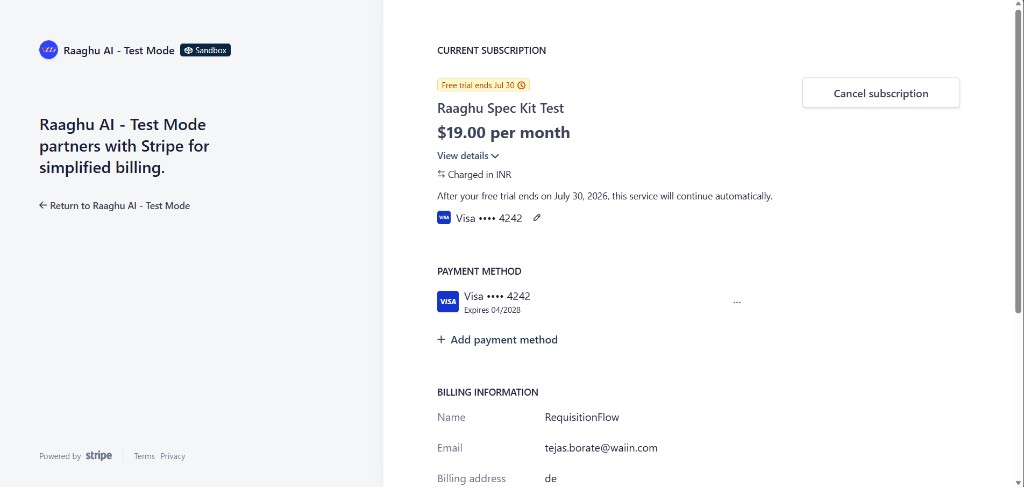
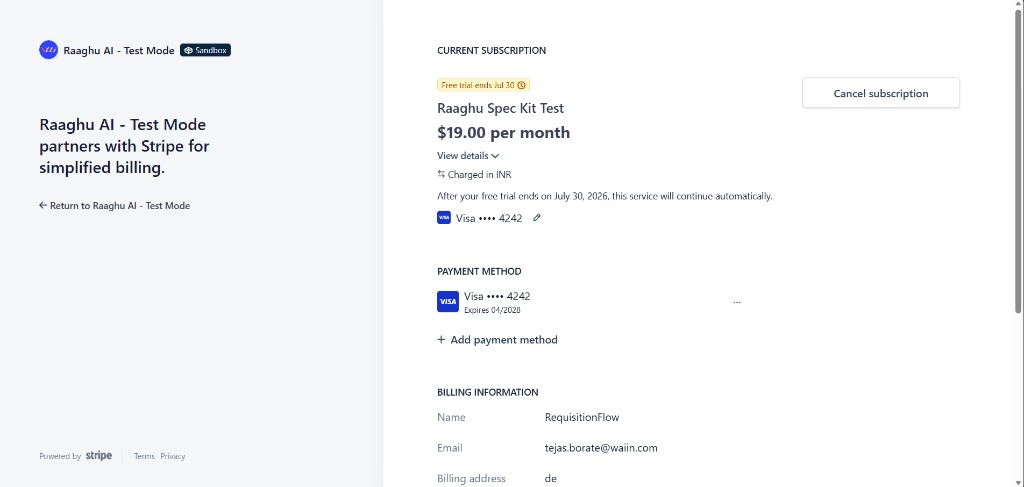
| Manage Billings | Open the Stripe portal for invoices and payment methods. During a free trial, this action is framed as upgrading to a paid plan when you are ready. |
| Cancel subscription / Undo cancellation | Cancel schedules end-of-period termination. While status is Canceling, click Undo cancellation to keep the plan. Cancel is hidden while the organization is on a free trial. |
You also see seats purchased / assigned / available and AI credit balance vs spend.
- Paid (card billing): Billing summary shows billing cycle, next payment date, and monthly total. Plan badge: Paid.
- Free trial: Plan badge shows Free trial. The summary panel is Trial summary (plan, Trial ends on, seats) instead of next payment / monthly total.
- License key: Plan badge shows License key instead of Paid, and Billing summary shows only Expires on.
Adjust Seats
Use − / + to change the seat count, review the price breakdown, then confirm. You cannot go below the number of seats already assigned — unassign users on the Users tab first.
Top up Raaghu AI credits
Choose a preset amount ($10, $25, $50, $100) or enter a custom amount, then proceed to payment.
Manage Billings
Opens the Stripe customer portal for payment methods, invoices, and subscription details.
Users
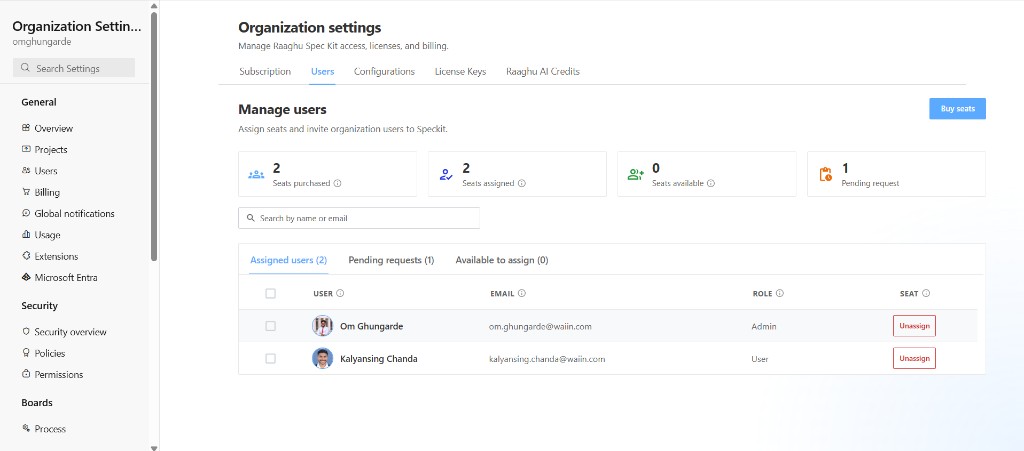
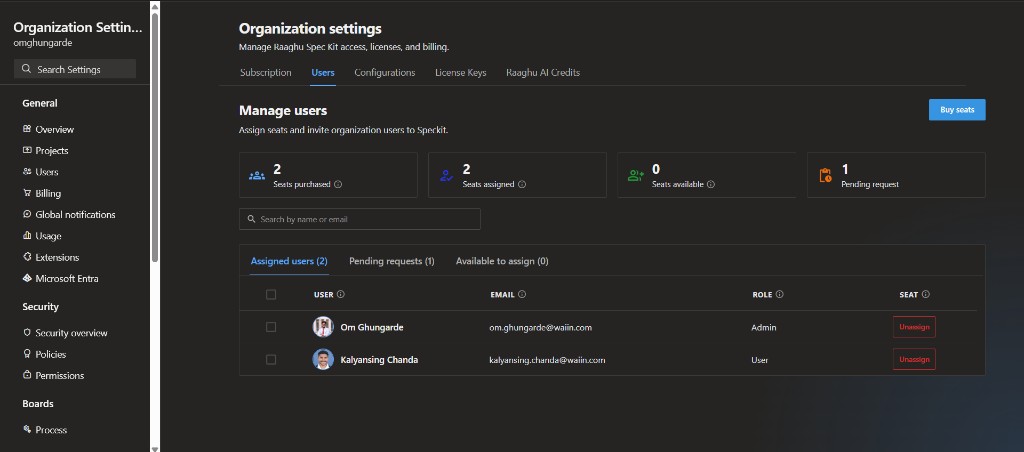
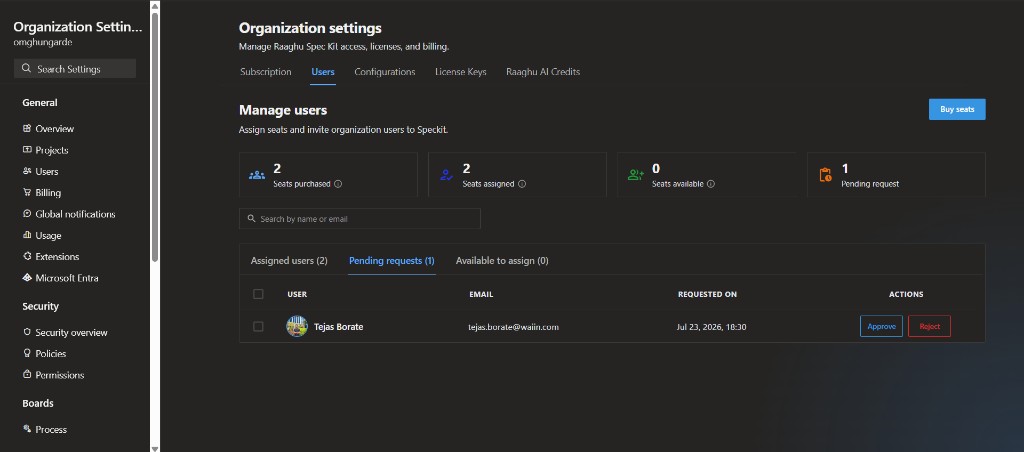
The Users tab (Manage users) is where you approve first-time access requests and assign seats. Subtitle in the product: "Assign seats and manage who can use Raaghu Spec Kit."
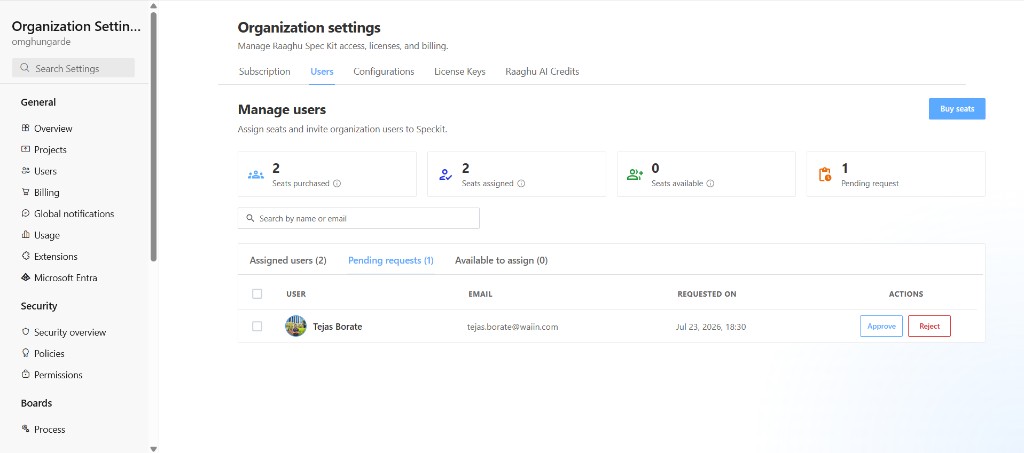
Stats show Seats purchased, Seats assigned, Seats available, and Pending requests. Use Search by name or email across the lists. If you are subscribed, you can also open Buy seats from this page (disabled during a free trial).
Sub-tabs:
| Sub-tab | What you do |
|---|---|
| Assigned users | Members who currently have a seat. Unassign one user, or select several and Unassign selected. |
| Pending requests | First-time users waiting for approval. Per row: Approve or Reject. Select two or more rows to Approve selected. Columns: User, Email, Requested on, Actions. Empty state: "No pending access requests." |
| Available to assign | Members you can give a seat (Assign seat, or bulk assign when multiple are selected). Empty states: "No available users." or "No users match this search." Use Load more users when more org members may exist beyond the current list. |
Approving an access request is not enough — the member also needs a seat. After Approve (or Approve selected), Spec Kit opens a seat prompt:
- Give this user a seat? (single) or Assign seats to approved users? (bulk)
- Choose Assign seat to assign now, or Not now and assign later from Available to assign
- If no seats are left, the dialog explains that all purchased seats are assigned — Unassign a seat or buy more seats on Subscription / Buy seats when available
Important: Members need an assigned seat to use Spec Kit — even when the organization is subscribed, on trial, or using a license key.
Details: Access Requests.


AI Settings
The AI Settings tab is where you manage organization-wide AI provider connections, assign them to projects, and manage Raaghu AI credits.
Subtitle in the product: "Manage AI connections for your organization and assign them to projects." (On the credits sub-tab: "Add credits, manage spending limits, and track AI usage.")
Three sub-tabs: Organization, Project, and Raaghu AI Credits.
Organization
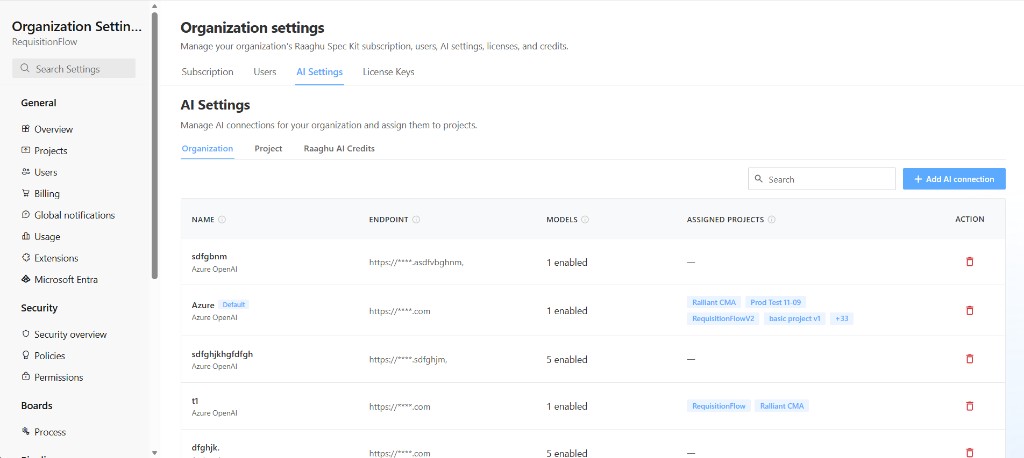
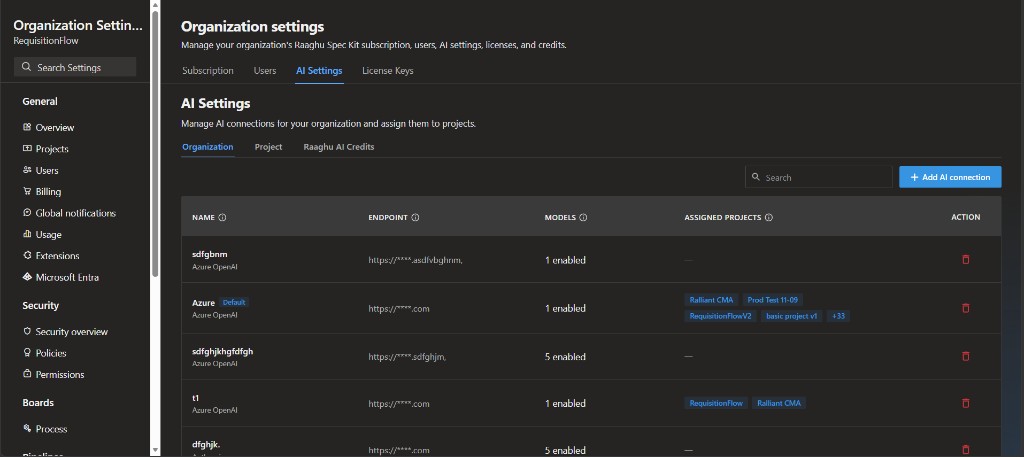
On the Organization sub-tab, create and manage shared organization connections used across projects.
- Click + Add AI connection to add a connection (same fields as project Add LLM: Title, AI Provider, Model, Endpoint, API Version, API Key, Expiration — including a custom expiration date).
- Review the table: Name, Endpoint (masked), Models (for example, 1 enabled), and Assigned projects (badges for assigned projects).
- Use the row delete control to remove a connection when needed (confirm with Delete AI connection?).
Empty state: "No organization AI connections yet. Click Add AI connection to create one." New connections can be set as the organization default.
Project
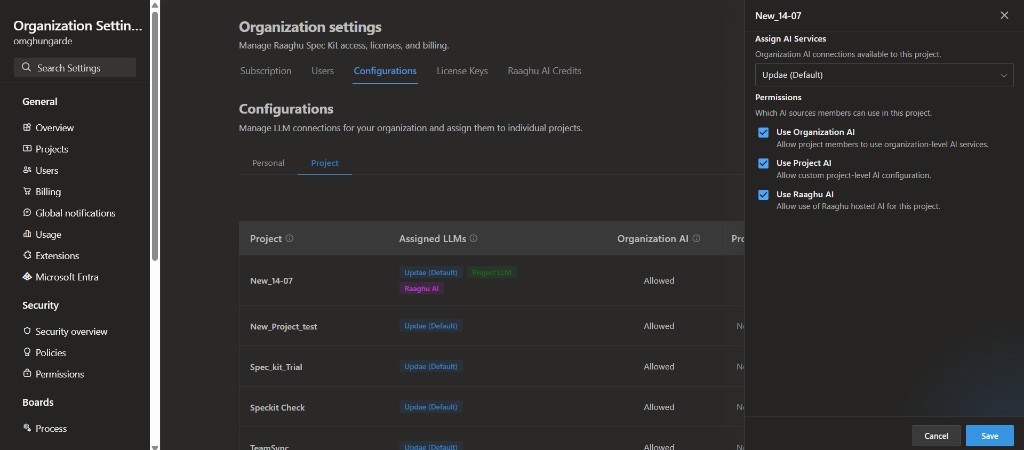
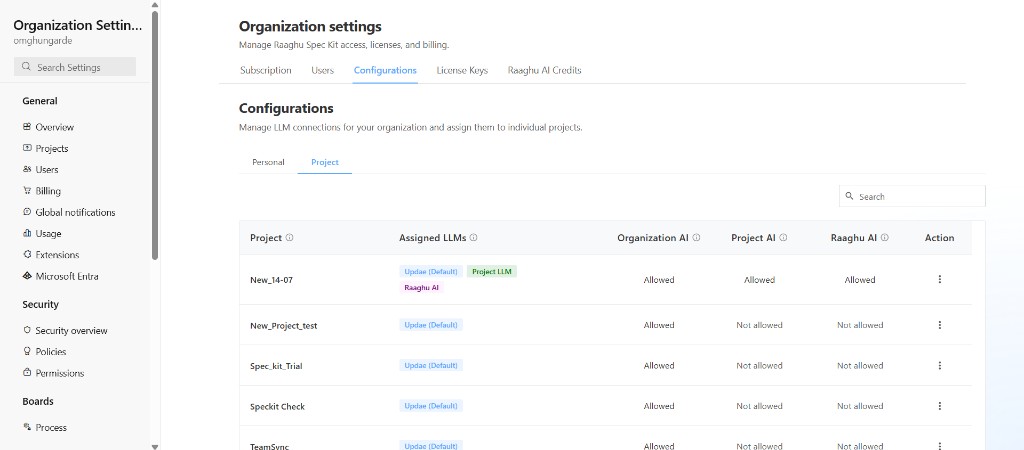
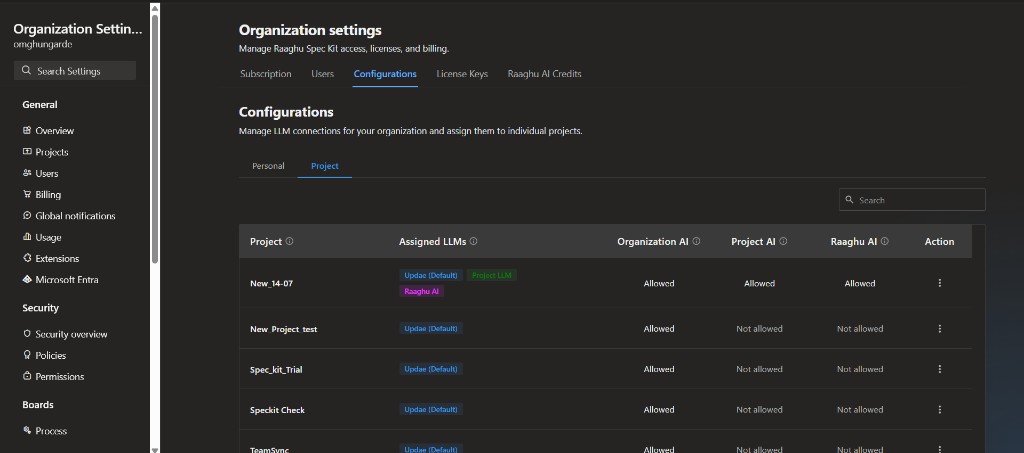
On the Project sub-tab, review which AI sources each Azure DevOps project may use:
| Column | Description |
|---|---|
| Project | Azure DevOps project name |
| Assigned LLMs | Org connections assigned to the project (for example, Azure (Default)), plus badges such as Project LLM or Raaghu AI when those sources are allowed |
| Organization AI | Whether project members can use organization-level AI connections (Allowed / Not allowed) |
| Project AI | Whether custom project-level AI configuration is allowed |
| Raaghu AI | Whether Raaghu-hosted AI (credits) is allowed for this project |
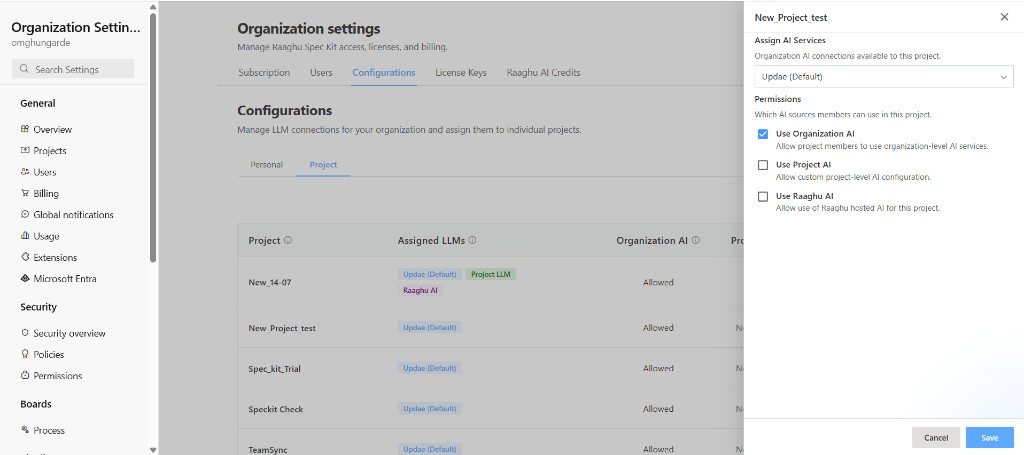
Open a project's ⋯ menu (or select the project) to edit settings in the side panel:
- Assign AI Services — choose which organization connections are available to the project (enabled when Use organization AI is checked). Empty selection inherits the org default.
- Permissions — independently toggle Use organization AI, Use project AI, and Use Raaghu AI, then Save.
When Use organization AI is unchecked, the Assigned LLMs control is disabled and may show a status label such as "Project LLM", "Raaghu AI", or "No AI configured".
Raaghu AI Credits
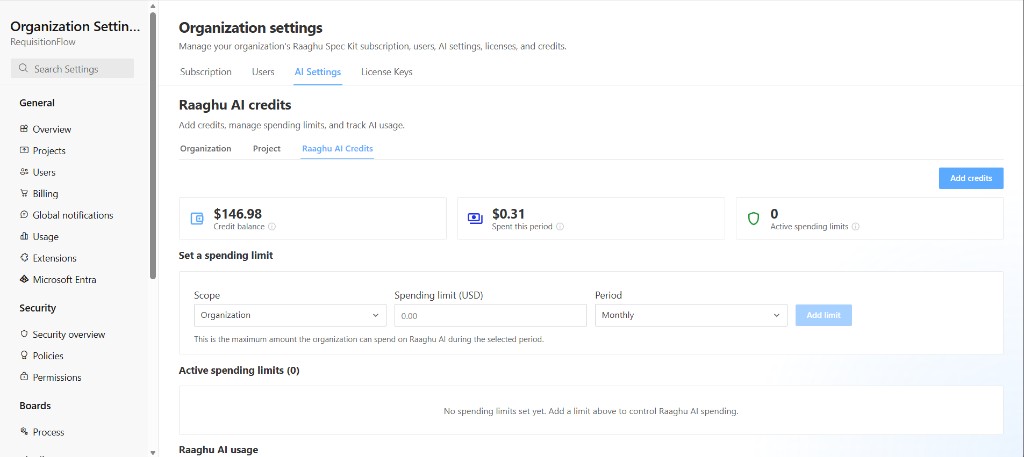
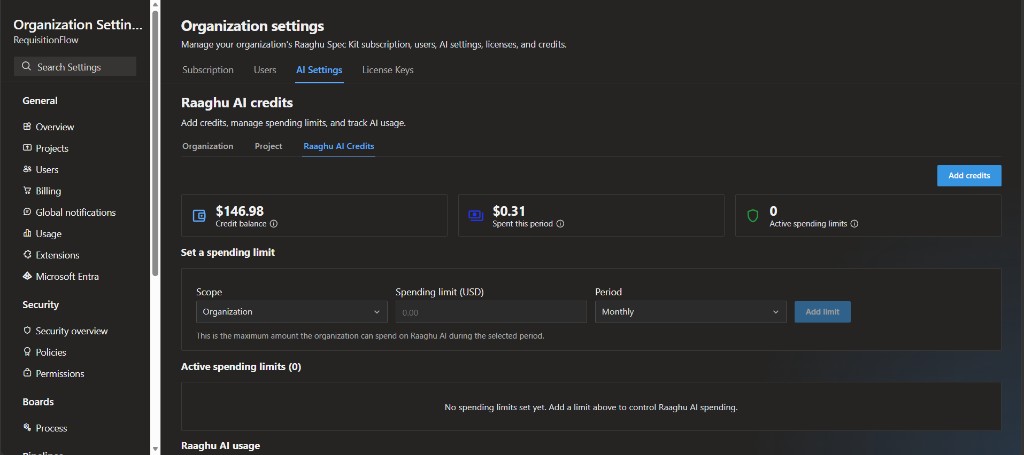
On the Raaghu AI Credits sub-tab (no longer a top-level org tab), add hosted credits and set spending limits for Raaghu AI only.
- View Credit balance, Spent this period, and Active spending limits
- Click Add credits (you can also top up from Subscription → Top up Raaghu AI credits)
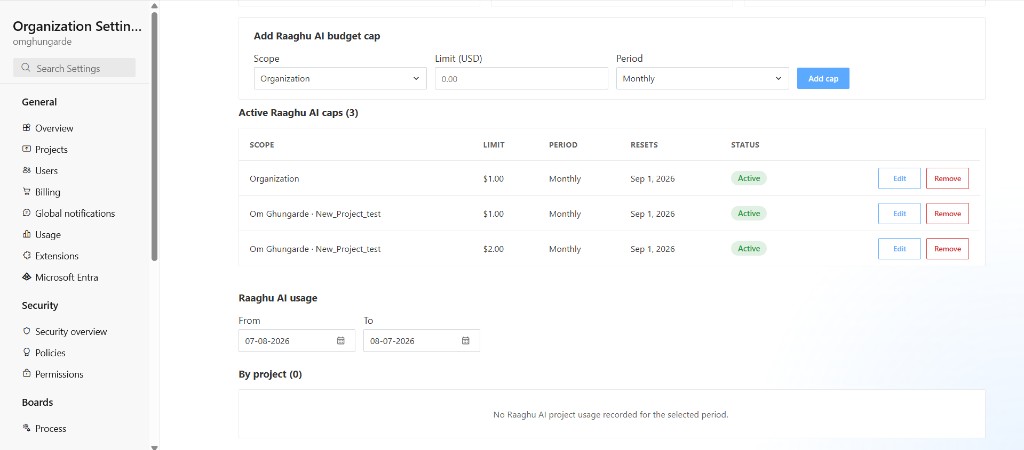
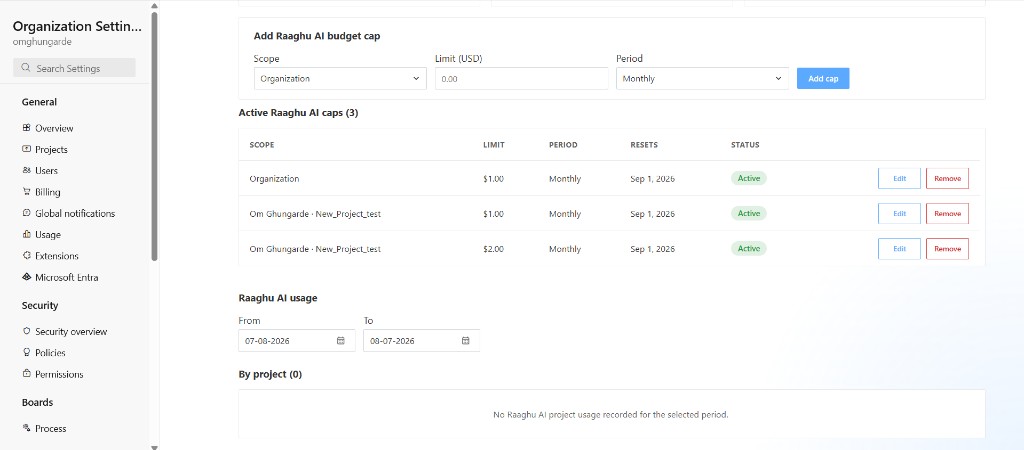
- Under Set a spending limit, choose Scope, Spending limit (USD), and Period (Monthly or Lifetime), then Add limit
- Review Active spending limits and edit or delete existing limits
- Raaghu AI usage shows organization-wide hosted AI spend for a date range, including breakdown By project. Members see their own spend under My AI usage
License Keys
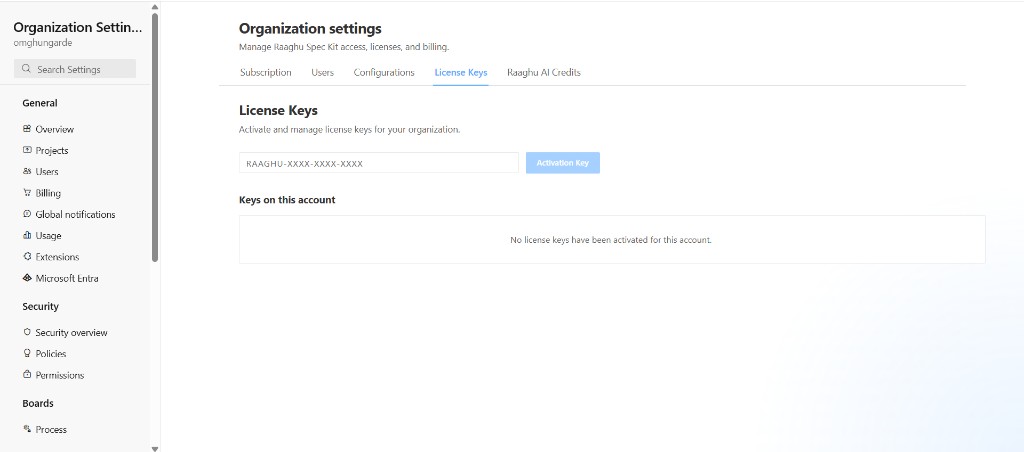
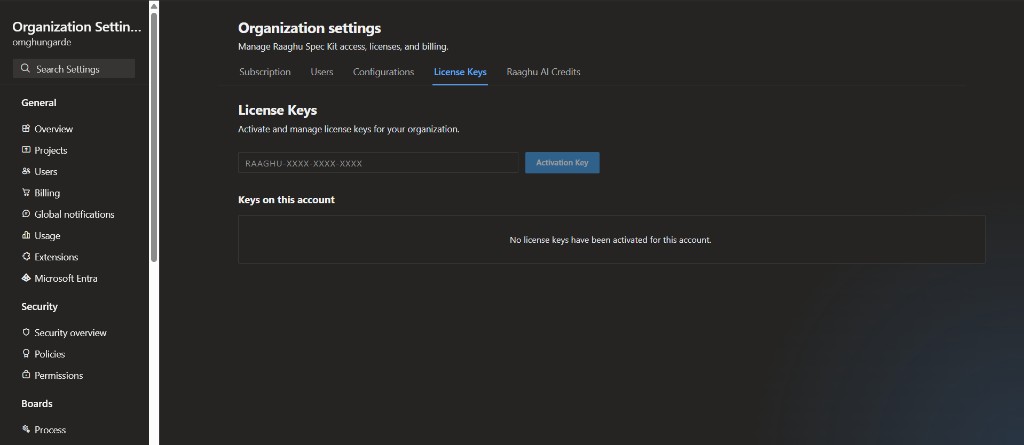
Activate and manage license keys for your organization — no Stripe checkout required.
Activate a key
- Open License Keys.
- Enter the key (format
RAAGHU-XXXX-XXXX-XXXX). - Click Activation Key — Spec Kit validates first and shows a preview (plan, type, validity).
- Click Confirm & activate to redeem, or Cancel to go back without activating.
Keys on this account lists active entitlements with:
| Column | Description |
|---|---|
| Plan | Plan tier and seat count (e.g. SpecKit · 1 seats) |
| Status | Active, Expiring (≤30 days left), or Expired |
| Expires | Relative expiry (e.g. in 30 days) or the end date |
Empty state: "No license keys have been activated for this account."
After activation, billing method becomes License key. On Subscription, the plan badge shows License key, and Billing summary shows only Expires on.